How to turn a photo into editable layers
Split a flat photo into a cut out subject and a filled in background, then move the subject, put text behind it and edit each part on its own.

A photo is flat. Everything in it, the person, the product, the table and the wall, lives in one layer of pixels. That is fine until you want to move the subject a little to the left, put a headline behind someone's head, or brighten the background without touching the face. Then you need the photo in pieces.
Splitting a photo into layers does exactly that: the subject goes onto its own transparent layer, and the background gets a second layer with the hole behind the subject filled in. This guide shows how to do it in DesignBat, the design and photo app in OfficeBats, and what you can do with the layers afterwards.
What you need
- A photo with a clear main subject: a person, a product, an animal or one main object.
- A free OfficeBats account to open the photo editor and save your project.
- A computer or tablet browser. Finding the subject runs on your device.
How splitting into layers works
When you split a photo, DesignBat does three things:
- Finds the subject with an on device model, the same one behind Select, then Subject.
- Cuts the subject out onto a new layer, with a softened edge so it does not look jagged.
- Fills in the background where the subject was. When AI image tools are available, the gap is painted by AI so the scene continues naturally; this uses AI credits. Otherwise it is filled from the surrounding pixels on your device.
Your original photo is not changed. It is hidden, and the new layers sit in a group above it, so you can always switch back.
Step 1: open the photo
From Your designs, choose Edit a photo, then Open a file or From your Drive. The photo editor opens PNG, JPG, WebP, GIF, TIFF and PSD files. If the photo is already in a design, select it and press Edit photo in the toolbar; when you finish, File, then Done, back to the design puts it back.
Step 2: press Split into layers
Open the Edit with words tab on the right and scroll down to Layers, depth and text. Press Split into layers.
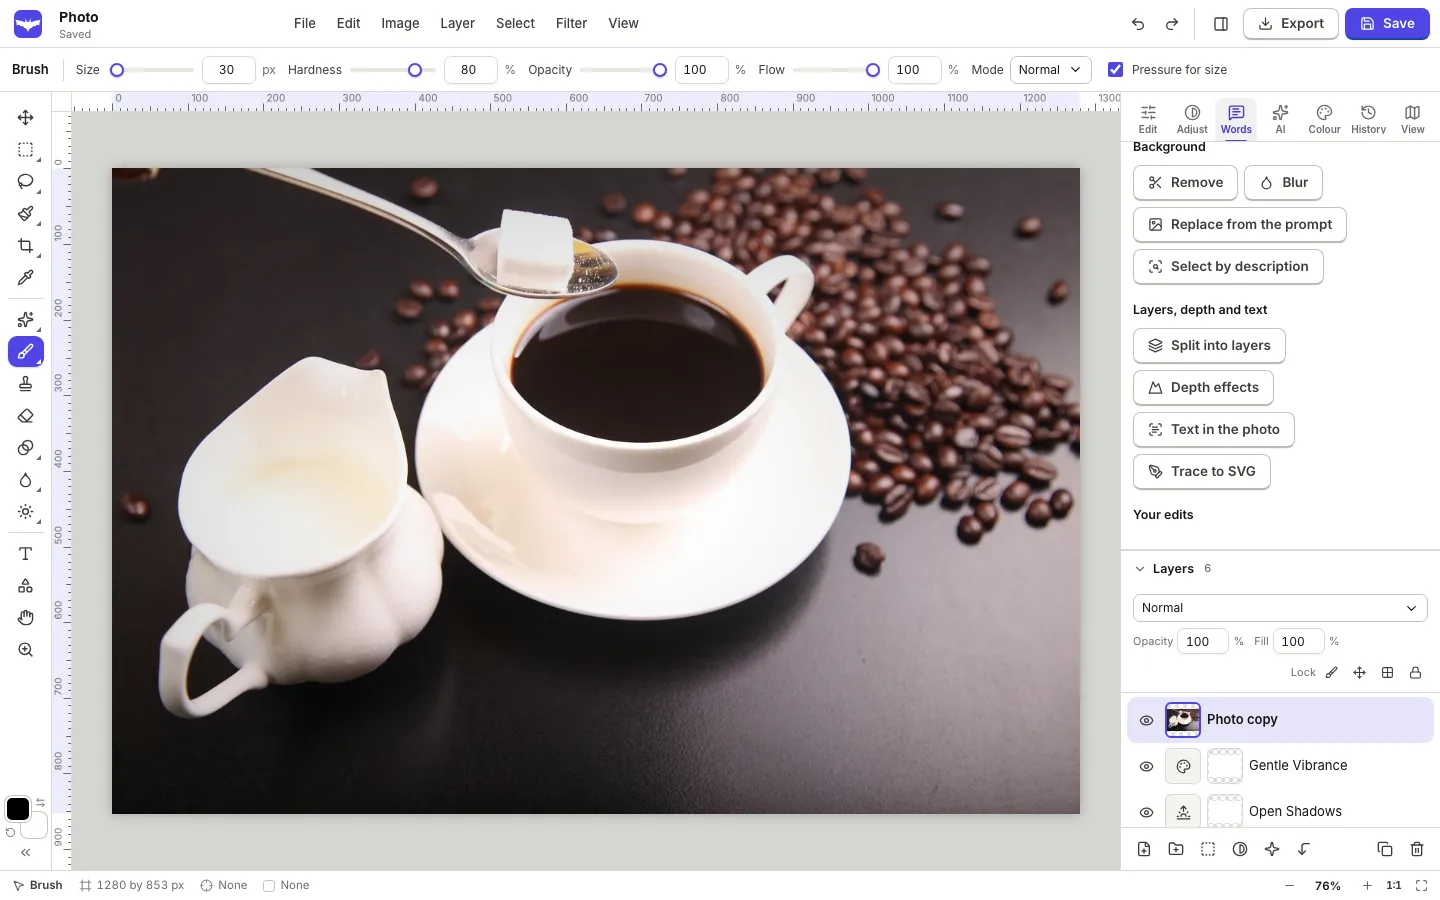
A progress message shows while DesignBat finds the subject and fills in behind it. When it finishes, look at the Layers panel. You now have a group called Layers from the photo with two layers inside:
- Subject: the cut out, on a transparent layer, trimmed to its own size.
- Background (filled): the full scene with the subject's area filled in.
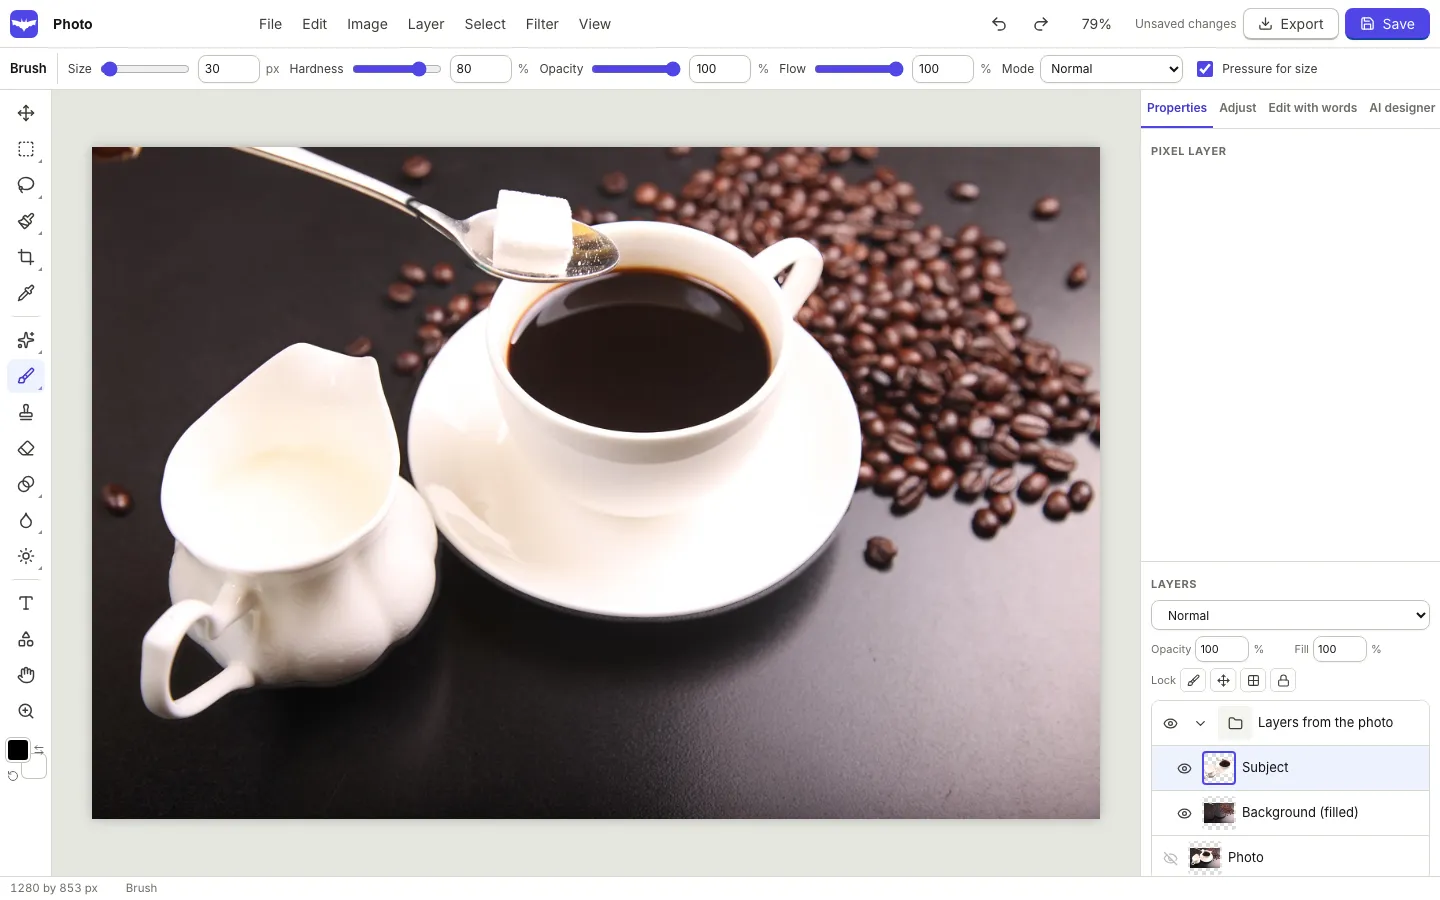
Hide the Subject layer with its eye to check the filled background. Small smudges where the subject used to be do not matter if the subject will cover them again; they only matter if you plan to move the subject far away.
Step 3: edit each layer on its own
Now that the parts are separate, you can do things that are impossible on a flat photo.
Move or resize the subject
Click the Subject layer, pick the move tool and drag. To resize or rotate, choose Edit, then Free transform (Ctrl+T). Because the background was filled in behind it, there is no hole where the subject was.
Put text behind the subject
This is the classic magazine cover look, where the headline sits behind a person's head.
- Click the Background (filled) layer so it is the active layer.
- Pick the Text tool (T) and click on the photo. The new text layer goes directly above the active layer, so it lands between the background and the subject.
- Type the headline and set the font, size and colour.
- Move it so the subject overlaps part of the letters.
If a text layer ends up in the wrong place, drag it in the Layers panel, or use Layer, then Bring forward or Send backward.
Adjust the background only
Select Background (filled) and use the Adjust tab, or add an adjustment layer, to darken, desaturate or warm it up. For a soft focus look, use Filter on the background layer. The subject stays exactly as it was, which makes it stand out.
Change the subject only
Select Subject and brighten it, sharpen it or add a layer style such as a soft shadow or an outer glow (Layer, then Layer style). A thin glow or shadow helps a subject pop against a busy background.
More ways to take a photo apart
The same section of the panel has three more tools that work well with layers:
| Tool | What it does |
|---|---|
| Depth effects | Measures how far away each part of the photo is, then adds lens blur, fog and haze, or selects a range of depth |
| Text in the photo | Finds the lines of text in the photo. Change a line and press Replace, or press As text layer to turn it into an editable text layer over a cleaned background |
| Trace to SVG | Traces the picture into vector shapes and downloads an SVG file, best for logos and simple graphics |
Text in the photo is useful for signs, labels and old graphics where the words are baked into the pixels. Turning them into text layers means you can fix a typo, translate a word or change the font without repainting.
Save the layers
You have three ways to keep your work:
- Save the photo project. It keeps every layer, mask, group and adjustment so you can reopen and keep editing.
- File, then Export, and choose PSD with layers to open the file in another editor. Pixel layers, groups, masks and blend modes come across; text and shapes are written as pixels.
- Export a flat PNG, JPG or WebP when the image is finished. Hide the layers you do not want in the final picture first.
Exports are also saved to your OfficeBats Drive, so the finished picture is ready in a DesignBat design, a SlidesBat deck or a Buildan.app website. See one Drive for all your office files.
Credits and plans
Finding the subject, filling from the surroundings, depth effects, text recognition and tracing run on your device and use no AI credits. When the background is filled by AI instead, that uses credits from your shared OfficeBats AI wallet. The Free plan includes 10 AI actions a day and Pro includes 300. See AI credits explained and pricing.
Tips for clean layers
- Pick photos with a clear subject. A person against a wall splits better than a crowd.
- Check the subject's edge at 100 percent. Paint the layer with the eraser, or add a mask, to tidy stray pixels.
- Keep the original. It stays hidden under the group. Turn it back on to compare.
- Do not move the subject too far if the filled background has visible traces; a small shift hides them.
- Combine with prompts. After splitting, select the background layer and use Edit with words to change the scene while the subject stays untouched.
If all you need is the cut out, removing the background is quicker. If the layered photo is going into a thumbnail, see how to make a YouTube thumbnail that gets clicks.
Frequently asked questions
How do I separate a photo into layers?
Open the photo in the DesignBat photo editor, go to the Edit with words tab and press Split into layers under Layers, depth and text. You get a group with the cut out Subject and a Background (filled) layer.
Is the background behind the subject really filled in?
Yes. Where the subject was, the background is filled so the scene continues. When AI image tools are available, AI paints the gap; otherwise it is filled from the surrounding pixels on your device.
Can I put text behind a person in a photo?
Yes. After splitting, click the Background (filled) layer, pick the Text tool and click on the photo. The text layer is added above the background and below the subject, so the person overlaps the words.
Can I export the layers to another editor?
Yes. Choose File, then Export, and pick PSD with layers. Pixel layers, groups, masks and blend modes are kept. You can also save a DesignBat photo project to keep every layer editable in DesignBat.
Does splitting a photo into layers use AI credits?
Finding and cutting out the subject runs on your device and is free. Filling the background with AI uses credits from your OfficeBats AI wallet; the on device fill from the surroundings does not.