How to remove the background from a photo online
Cut out a person or product in one click, clean the edges, then save a transparent PNG or put the subject on a new background. Free and in your browser.

Product shots on white, a headshot on a brand colour, a person cut out for a poster or a thumbnail: removing the background is one of the most common photo jobs there is. It used to mean an hour with a pen tool. Today it takes one click, as long as you know how to check and fix the edges afterwards.
This guide shows two ways to do it in DesignBat, the design and photo app in OfficeBats: the quick way inside a design, and the careful way in the photo editor, where you can refine the edge, keep the result editable and save a transparent PNG. Both run on your own device and use no AI credits. At the end, you will see how to put the subject on a completely new background with AI.
What you need
- A photo with a clear subject: a person, a product, a pet or an object that stands apart from what is behind it.
- A free OfficeBats account to save your work. It also gives you a 5 GB Drive shared by every Bats app.
- A browser on a computer or tablet. The cut out is calculated on your device, so your photo is not sent anywhere to remove the background.
The quick way: inside a design
Use this when the photo is already part of a poster, social post or slide and you just want the subject without its background.
- Open the design and click the photo to select it.
- In the toolbar above the canvas, press Remove background.
- A message says the background is being removed on this device. A moment later the photo is replaced by the cut out, and you can move, resize and layer it like any other element.
If the result is not what you wanted, press Undo, or select the photo and use Restore the original background in the properties panel. The original is kept with the element, so nothing is lost.
Many photos at once
Select several photos (Shift click them on the canvas) and the toolbar offers Remove N backgrounds, where N is the number of photos. This is handy for a product grid or a team page, where every photo needs the same treatment. Next to it, Smart crop all frames each subject so it sits well in its frame.
The careful way: in the photo editor
Use the photo editor when the edge matters: hair, fur, see through objects, or a cut out you will use in several places.
Step 1: open the photo
From Your designs, choose Edit a photo and press Open a file, or use From your Drive. The photo editor opens PNG, JPG, WebP, GIF, TIFF and PSD files. If the photo is already in a design, select it and press Edit photo in the toolbar instead; when you finish, File, then Done, back to the design puts the edited photo back where it was.
Step 2: remove the background as a mask
Open the Edit with words tab on the right and scroll to Background. You will find three buttons:
| Button | What it does | Credits |
|---|---|---|
| Remove | Finds the subject and hides the background with a layer mask | None, runs on your device |
| Blur | Adds a blurred copy of the background behind the subject | None, runs on your device |
| Replace from the prompt | Paints a new background from your description | AI credits |
Make sure the photo layer is selected in the Layers panel, then press Remove. The background disappears behind a checkerboard, which is how the editor shows transparency.
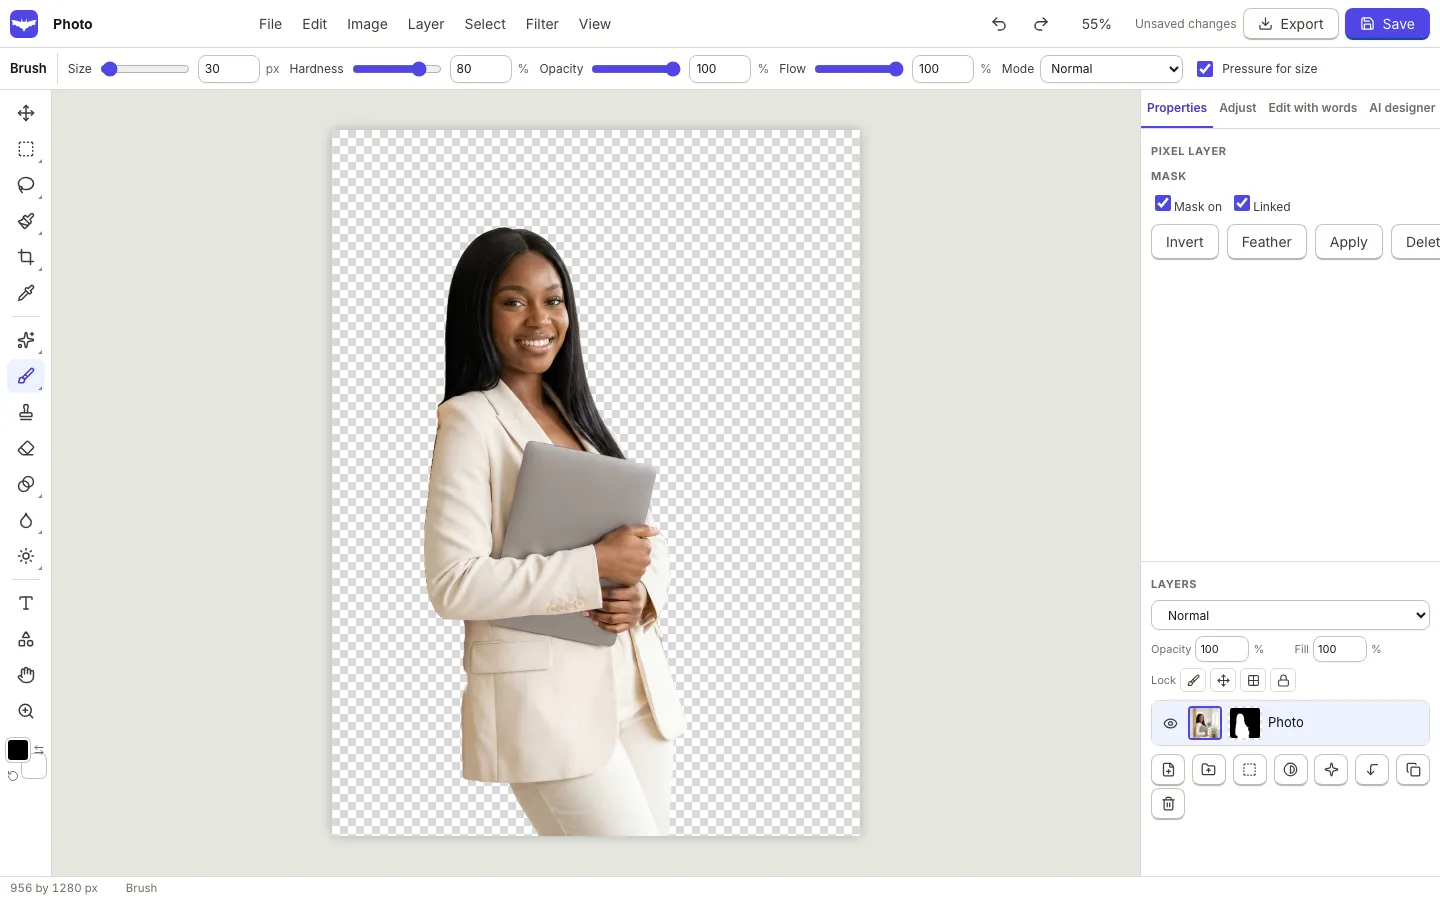
The important detail is that nothing has been deleted. The background is hidden by a layer mask, the black and white thumbnail next to the photo in the Layers panel. White shows, black hides. That means you can fix mistakes with a brush instead of starting again.
Step 3: fix the edges
Zoom in to 100 percent (View, then Actual pixels) and look around the hair, fingers and any gaps between arms and body. Then:
- Paint the mask. Click the mask thumbnail, pick the brush, and paint with white to bring back parts that were cut off, or with black to hide leftovers. A soft brush at low opacity gives the most natural edge.
- Use the mask buttons. In the properties panel, Mask on turns the mask off and on so you can compare, Invert swaps what shows and what hides, and Feather softens the whole edge.
- Refine edge for hair and fur. Choose Select, then Subject to select the person or product, then Select, then Refine edge (Ctrl+Alt+R). Adjust Smooth, Feather, Contrast and Shift edge while you watch the preview, turn on Clean edge colours to remove the old background's colour from the fringe, and set Output to Layer mask.
The Select menu has three versions of subject selection: Subject, Subject (portrait model) for people, and Subject (best detail, large download) for difficult edges. Try the portrait model on headshots before reaching for the brush.
Step 4: save a transparent PNG
Choose File, then Export, and pick PNG (keeps transparency). JPG has no transparency, so the background would come back as a solid colour. If you plan to keep editing, also Save the photo project, which keeps every layer and mask. Exports are saved to your OfficeBats Drive as well, so the cut out is ready in DesignBat, SlidesBat or any other Bats app.
Put the subject on a new background
A transparent cut out is often only half the job. You can place it on a new background in two ways.
In a design. Drop the cut out onto a coloured page, a gradient, a pattern or another photo. Add a soft drop shadow so it does not look pasted on. This is the most flexible option, because the background stays a separate layer you can change.
With AI in the photo editor. Type the scene you want in the Edit with words box, for example "a white marble kitchen counter with a bright window behind", then press Replace from the prompt. DesignBat keeps your subject and paints a new background around it, lit to match, as a new layer. Hide the layer to see the original, or delete it to try another description.

Background replace uses your shared OfficeBats AI credits and needs you to be signed in. The Free plan includes 10 AI actions a day and Pro includes 300, both paid with credits from your wallet. Read AI credits explained for how the wallet works.
Tips for clean cut outs
- Start with the best photo you have. Good light and a subject that stands out from the background give the cleanest edge.
- Check at 100 percent. Edges that look fine zoomed out often show a halo up close.
- Keep the mask. Avoid applying the mask until you are sure. A mask can always be repainted; deleted pixels cannot.
- Match the light. When you place a cut out on a new background, a shadow under the subject and a slight colour adjustment make it belong there.
- Use PNG for transparency. JPG fills transparent areas with a colour. WebP also keeps transparency and makes smaller files for the web.
If the next step is a thumbnail, see how to make a YouTube thumbnail that gets clicks. If you want to go further and move the subject around the scene, see how to turn a photo into editable layers.
Frequently asked questions
Can I remove the background from a photo for free?
Yes. In DesignBat, Remove background in a design and Remove in the photo editor both run on your device and use no AI credits. The Free plan covers them, and new accounts also get a 5 GB Drive for the results.
Is my photo uploaded to remove the background?
No. The background removal model runs in your browser. DesignBat downloads the model once the first time you use it; your photo is not sent anywhere to cut it out.
How do I save a photo with a transparent background?
In the photo editor, choose File, then Export, and pick PNG (keeps transparency). In a design, export as PNG or WebP and turn on Transparent background. JPG does not support transparency.
How do I fix hair and fine edges?
Paint the layer mask with a soft brush, use Feather on the mask, or use Select, then Refine edge, with Clean edge colours turned on and the output set to Layer mask. Subject (portrait model) often handles hair better on headshots.
Can I replace the background instead of removing it?
Yes. Describe the new scene in the Edit with words box in the photo editor and press Replace from the prompt. The new background arrives as a separate layer. This uses AI credits.